Capture Identity of Requestor Assertion
The Capture Identity of Requestor assertion is used to determine the identity of a requestor (that is, the customer) for auditing or reporting using any of the following methods:
gateway90
The
Capture Identity of Requestor
assertion is used to determine the identity of a requestor (that is, the customer) for auditing or reporting using any of the following methods:- By capturing the requestor's IP address
- By capturing the requestor's authenticated User ID (where available)
- By capturing the value from a context variable that contains identifying information about the requestor (for example, from a context variable created by the Evaluate Request XPath, Evaluate Response XPath, or Evaluate Regular Expression assertions, or a context variable that extracts information from the HTTP header)
You can define up to five mappings in a Capture Identity of Requestor assertion, however there can only be a maximum of five distinct mappings per policy, regardless of how many assertions are present. A "distinct mapping" is defined as follows:
- Each context message mapping consists of three parts:Type, Key, Value
- Mappings are distinct if their Types differ OR if the Type is the same, the Keys differ
Example 1:
These mappings are distinct:Mapping 1:
IP Address, IP_ADDRESS (SYSTEM DEFINED)Mapping 2:
Custom Mapping, My_Value, Gold_MedalExample 2:
These mappings are also distinct:Mapping 1:
Custom Mapping, Value_A, Gold_Medal Mapping 2:
Custom Mapping, Value_B, Gold_MedalThe information that is captured can be viewed in the [Details] tab of the Gateway Audit Events window:
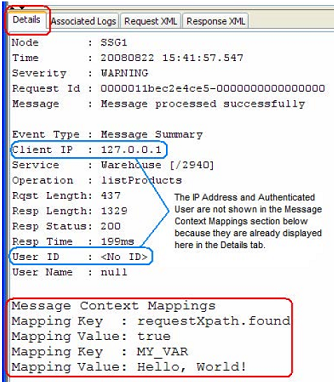
Viewing message context mappings in the Gateway Audit Events window
Using the Assertion
- Do one of the following:
- To add the assertion to the Policy Development window, see Add an Assertion.
- To change the configuration of an existing assertion, proceed to step 2 below.
- Right-clickCapture Identity of Requestorin the policy window and selectRequestor Identity Propertiesor double-click the assertion in the policy window. The assertion properties are displayed.
- Configure the properties as follows:To...Do this...Add a message context mapping
- Click [Add]. The Configure Message Context Mapping dialog appears. You can add a maximum of five mappings per Capture Identity of Requestor assertion.
- Select the mappingType:
- IP Address:Obtain the identity from the customer's IP address.
- Authenticated User:Obtain the identity from the customer's authenticated User ID.
- Custom Mapping:Obtain the identity using a custom mapping defined in the Key and Value fields.
- In theKeyfield, enter a string of text (no spaces) to identity your custom mapping. The key cannot be changed when using theIP AddressorAuthenticated Usertypes.
- In theValuefield, specify a context variable that holds identifying information about the requestor.The following are examples of context variables that you can use:
- ${request.username}
- ${request.authenticateduser}
- a context variable created by an XPath assertion (Evaluate Request XPath or Evaluate Response XPath)
- a context variable created by the Evaluate Regular Expression assertion
- a context variable that returns information from the HTTP header
You can add descriptive text to the variable name to make it easier to read. For example, "High Value Customer: ${request.username}".The value cannot be changed when using theIP AddressorAuthenticated Usertypes.
Remove a message context mapping- Select the mapping to be removed. The last mapping cannot be removed.
- Click [Remove].
Edit a message context mapping- Select the mapping to be edited.
- Click [Properties]. The Configure Message Context Mapping dialog appears.
- Edit the fields as necessary. TheKeyandValuefields cannot be edited for system defined types.
- Click [OK] when done.
- Click [OK] when done.