Policy Authoring Tips and Best Practices
Creating a policy that is easy to maintain and upgrade uses principles similar to good coding practices: make it readable and use comments generously. The following are some best practices that CA Technologies encourages in its training (may be superseded by local style guides):
gateway91
Creating a policy that is easy to maintain and upgrade uses principles similar to good coding practices: make it readable and use comments generously. The following are some best practices that CA Technologies encourages in its training (may be superseded by local style guides):
- Always include a comment block at the top of the policyThis should describe the policy in general terms and define more specific terms, if required. To add a comment block, use the Add Comment to Policy Assertion.Tip:Comments display as one continuous line in the policy; they do not line wrap. For longer comments, consider using a series of "Add Comment" assertions.
- Include versioning notes in the comment blockPolicies migrate through the enterprise and versioning notes are key to tracking changes.Tip:If you use revisions extensively, also consider adding a comment for each revision. For more information, see Policy Revisions.
- Include information about passed arguments if policy is tied to encapsulated assertions, as well as any cluster-wide properties and global shared context variables.These should be in the comment block. The actual references are usually buried deep within the policy, so the policy is easier to comprehend if they are documented up front.Tip:Remember to update the comment as you add or remove references.
- Use "right side" comments extensively to describe what is happeningMany assertions hide their configurations inside their property dialogs, so the only way to understand what is happening is to open each assertion or (preferably) describe the configuration in a right-side comment.Tips:(1) The "right" and "left" comments are added through the Add Comment to Policy Assertion. (2) If your comments are not visible, clickShow Commentsin the Policy Tool Bar or use the View menu.
- Use "left side" comments sparinglyThe policy language is designed to read "VERB ACTION":"Add comment...", "Authenticate against...". Adding left side comments break up this readability. You should add left comments only to draw specific attention to a line, otherwise use right-side comments for everything.
- Always start right-side comments with a consistent, familiar delimiterA common delimiter is '//', which is well known and improves the readability of the comment.Tip:Simply relying on the gray text applied to comments is often not clear enough. Moreover, policy fragments also display as gray text, causing it to be indistinguishable from comments added within a fragment.
- Composite assertions should always have a commentDescribe the intent of the logical AND ("All assertions must...") and OR ("At least one assertion...") assertions in a comment. This is good practice, so that other users do not need to open the folder and analyze the contents to determine the intent of the composite assertion.Tip:For lengthier descriptions, use a series of Add Comment to Policy Assertions instead of one long right-side comment.
- Use the "All assertions must..." folder to group functionalityThe collapsing nature of this folder (and the "At least..." folder) hides logical structures, while leaving comments visible. When collapsed, the policy may be more readable and it is easier to get the "big picture".
- Prevent the "At least one..." folder from failing entire policyIf you do not want the failure of an "At least one assertion..." folder to fail the entire policy, then add a Continue Processing Assertion as a child assertion. This assertion always evaluates to true, preventing the policy from failing due a non-essential or conditional assertion failing.
- Never use a template response to return an error messageIt may seem logical to create a custom response message using the Return Template Response to Requestor Assertion when an error is encountered, but this is not the correct use of this assertion. Instead, always use the Customize Error Response Assertion and fail the policy. This ensures that the Gateway is correctly notified of the error and records the failure correctly in the logs.
- Turn on assertion line numbersTurn on assertion line numbers to help you edit or troubleshoot a policy. You can jump to a specific line number (Edit > Go to Assertion) or use the search feature (Edit > Find) to quickly locate an assertion. For more information, see Assertion Numbering.
- Ordering of assertionsSome policy assertions work together and require the presence of each other to succeed. For example, the Authenticate User or Group Assertion requires an authentication assertion such as the Require HTTP Basic Credential Assertion to provide the credentials for validating the user's identity. Moreover, the authentication assertion must appear before the user or group. This is one example of how the presence and order of assertions can affect the ultimate validity of a policy.
- Authentication assertion limitationAn authentication assertion (such as the Require HTTP Basic Credential Assertion) can only provide credentials for a single user or group. The authentication assertion must appear before the identity provider assertion (for example, Authenticate User or Group Assertion).
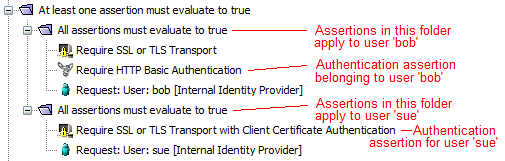
- Identity assertion recommendationIt is best not to include more than one first-level identity assertion in a policy or within an "At least" or "All assertions" folder. If you must because the client expects the Gateway to authenticate more than one identity per request, the policy validator displays a warning but you can still proceed.To add more than one user or group in a policy, place each individual Authenticate User or Group assertion in a separate "At least one assertion" or "All assertions" folder with an authentication assertion (and other assertions, as required).In the following figure, the credentials for user "Bob" are authenticated by the Require HTTP Basic Credential Assertion, while "Sue" is authenticated by the Require SSL or TLS Transport With Client Authentication Assertion.
- It is best to put a Stop Processing Assertion after any assertion whose sole purpose is to report on a prior error. Examples of such assertions include: Audit Messages in Policy Assertion, Send Email Alert Assertion, Send SNMP Trap Assertion, or Return Template Response to Requestor Assertion. Reason: These assertions always succeed, even though the intent is to halt the policy and send an HTTP challenge.Example 1:You construct the following expecting the policy to halt if authentication fails, but in this case the routing will occur regardless.Require HTTP Basic Credentials At least one assertion must evaluate to true Request: Authenticate against Internal Identity Provider Audit: "Authentication Failed!" RouteExample 2:To correct Example 1 so that the policy operates as intended, add a Stop Processing assertion:Require HTTP Basic Credentials At least one assertion must evaluate to true Request: Authenticate against Internal Identity Provider All assertions must be true Audit: "Authentication Failed!" Stop Processing Route
- In general, assertions should be placed before the routing assertion in a policy. This is to ensure that all assertion conditions are met before the request is routed to the protected web service or XML application.
- Exceptions to the above are the assertions designed to operate on the response; these are examples of assertions that should be placedafterthe routing assertion:
- Add Security Token Assertion (with target set to 'Response')
- Add Timestamp Assertion (with target set to 'Response')
- Encrypt Element Assertion (with target set to 'Response')
- Sign Element Assertion (with target set to 'Response')
- Assertions where you can specify the target message to be acted upon are prefixed with "Request:", "Response:", or "${VARIABLE_NAME}" in the policy window. For example:Request: Authenticate against XYZ or Response: Add signed Timestamp. For more information, see Select a Target Message.
- Pay attention to Policy Validation Messages window. It displays helpful messages as you configure or validate a policy.
- Use the Copy and Paste options on the Edit menu to help you organize the policy.
- Instead of deleting an assertion, consider disabling it instead. Disabling an assertion is useful during testing and troubleshooting. It has the same effect as deleting the assertion, but you can easily restore the assertion by re-enabling it,
- If you disable all assertions in a "All assertions..." folder, this folder will succeed. However if you disable all assertions within a "At least one..." folder, this folder will fail
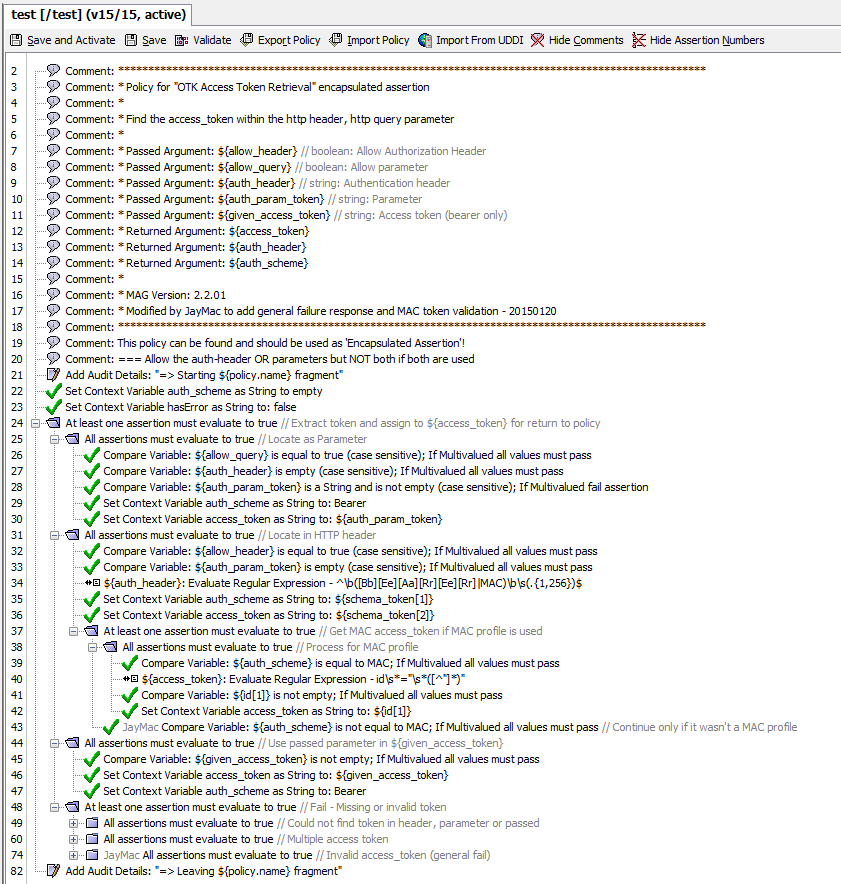
The following is an example policy that uses many of the best practices described above: