Splitting a Gateway Cluster
This topic describes how to reconfigure two appliances that are currently in a standard cluster configuration into two standalone Gateway instances. Each Gateway will have identical service and policy configuration after the split.
gateway83
This topic describes how to reconfigure two
API Gateway
appliances that are currently in a standard cluster configuration into two standalone Gateway instances. Each Gateway will have identical service and policy configuration after the split.There are occasions where a split cluster may be more advantageous. For example:
- Changing loads at your site makes two smaller clusters more efficient than a single large cluster.
- In larger scale deployments, having no cluster at all makes sense for some kinds of IT infrastructure.
- In certain specific version upgrades, splitting a cluster is a safer option to retain service levels while upgrades occur.
You can split a live Gateway cluster, as long as there is a load balancer is in place as a front-end to the two Gateways. The load balancer detects the absence of a processing node and adjusts accordingly.
This topic assumes that the PKI Certificate on each Gateway continues to use the preexisting certificate and public key that exists on both Gateways.
Splitting Gateway cluster
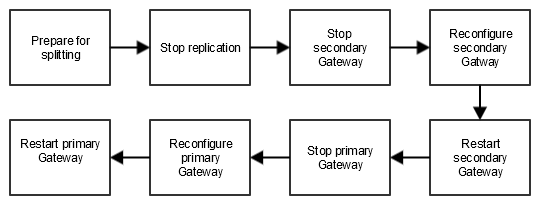
Workflow:
Step 1: Prepare the Gateway
In a cluster, all audits and service metrics are written to the primary MySQL database instance and then replicated to the secondary instance. After you split the cluster, the original and replicated records appear in each of the databases. If you do not want these records to exist in two places, then download and delete the audit records before splitting.
To preserve your old audit events:
- Open the Gateway Audit Event window.
- To download your audit events, selectFile > Download Audit Events. Once your audits are saved, you can delete them from the Gateway.
- To delete your old audit events, selectFile > Delete Old Audit Events.
For more information, see "Gateway Audit Event Actions" in View Gateway Audit Events.
Step 2: Stop Replication
- Run the following commands in a privileged shell on each Gateway:# mysql –h <hostname> -u <root> -p <password> –e "slave st"p"# mysql –h <hostname> -u <root> -p <password> –e "change master to master_host=''"
- Verify that replication has stopped by running the following command on each Gateway:mysql –h <hostname> -u <root> -p <password> –e "show slave status\G"Both Gateways should return no information.
Step 3: Stop Secondary Gateway
Run this command in a privileged shell on the secondary Gateway:
# service ssg stop
Step 4: Reconfigure Secondary Gateway
- Continuing in the privileged shell, run these commands on the secondary Gateway:# mysql ssg –h<hostname>-u<root user>-p<password>–e "delete from cluster_info"
- Open/etc/my.cnfin a text editor.
- Locate the following section:# Uncommment log-bin and log-slave-update if a clustered # db server log-bin log-slave-update # uncomment the next item on 1st db master server #server-id=1 # uncomment the next item on 2nd db master servers server-id=2And modify the section to this:# Uncommment log-bin and log-slave-update if a clustered # db server #log-bin #log-slave-update # uncomment the next item on 1st db master server #server-id=1 # uncomment the next item on 2nd db master servers #server-id=2Save and exit the editor.
- Restart themysqlddaemon with this command:# service mysqld restart
- Open the/ssg/etc/conf/partitions/default_/hibernate.propertiesfile in a text editor.
- Locate the line that resembles this (lines breaks are added here for readability):hibernate.connection.url = jdbc:mysql://gateway1.mycompany.com,gateway.mycompany.com/ssg?autoReconnect=false&characterEncoding=UTF8&characterSetResults=UTF8&connectTimeout=2000&failOverReadOnly=false&queriesBeforeRetryMaster=2000&secondsBeforeRetryMaster=20&socketTimeout=120000And change the line to this (entire command is one line):hibernate.connection.url = jdbc:mysql://<FQDN of Gateway Node>/ssg?autoReconnect=false&characterEncoding=UTF8&characterSetResults=UTF8&connectTimeout=2000&failOverReadOnly=false&queriesBeforeRetryMaster=2000&secondsBeforeRetryMaster=20&socketTimeout=120000Save and exit the editor.
Step 5: Restart Secondary Gateway
Run this command the secondary Gateway:
# service ssg restart
Step 6: Stop Primary Gateway
Run this command in a privileged shell on the primary Gateway:
# service ssg stop
Step 7: Reconfigure Primary Gateway
- Continuing in the privileged shell, run this command on the primary Gateway:# mysql ssg –e "delete from cluster_info"
- Open/etc/my.cnfin a text editor.
- Locate the following section:# Uncommment log-bin and log-slave-update if a clustered # db server log-bin log-slave-update # uncomment the next item on 1st db master server server-id=1 # uncomment the next item on 2nd db master servers #server-id=2And modify the section to this:# Uncommment log-bin and log-slave-update if a clustered # db server #log-bin #log-slave-update # uncomment the next item on 1st db master server #server-id=1 # uncomment the next item on 2nd db master servers #server-id=2Save and exit the editor.
- Restart themysqlddaemon with this command:# service mysqld restart
- Open the/ssg/etc/conf/partitions/default_/hibernate.propertiesfile in a text editor.
- Locate the line that resembles this (lines breaks added here for readability):hibernate.connection.url = jdbc:mysql://gateway1.mycompany.com,gateway2.mycompany.com/ssg?autoReconnect=false&characterEncoding=UTF8&characterSetResults=UTF8&connectTimeout=2000&failOverReadOnly=false&queriesBeforeRetryMaster=2000&secondsBeforeRetryMaster=20&socketTimeout=120000And change the line to this (entire command is one line):hibernate.connection.url = jdbc:mysql://<FQDN of Gateway Node>/ssg?autoReconnect=false&characterEncoding=UTF8&characterSetResults=UTF8&connectTimeout=2000&failOverReadOnly=false&queriesBeforeRetryMaster=2000&secondsBeforeRetryMaster=20&socketTimeout=120000Save and exit the editor.
Step 8: Restart Primary Gateway
Run this command the primary Gateway:
# service ssg restart