Configure GMU and Gateways for Migration
This topic describes how to configure the Gateway Migration Utility (GMU) and the gateway for a successful migration.
gateway92
This topic describes how to configure the Gateway Migration Utility (GMU) and the
CA API Gateway
for a successful migration.3
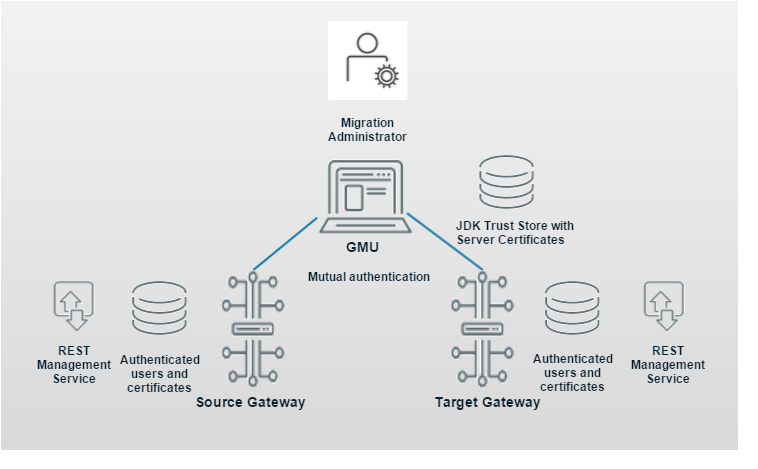
Configuration at a Glance
Configuring Gateways and GMU for migrations involves:
- Publishing the REST Management service on Gateways
- Establishing server trust and mutual authentication between GMU and Gateways through the migration Administrator
GMU_config_overview
Configure GMU and Gateways for Migration
The following tasks require:
- Administrator privileges
- Experience configuring aAPI Gateway
GMUtest99
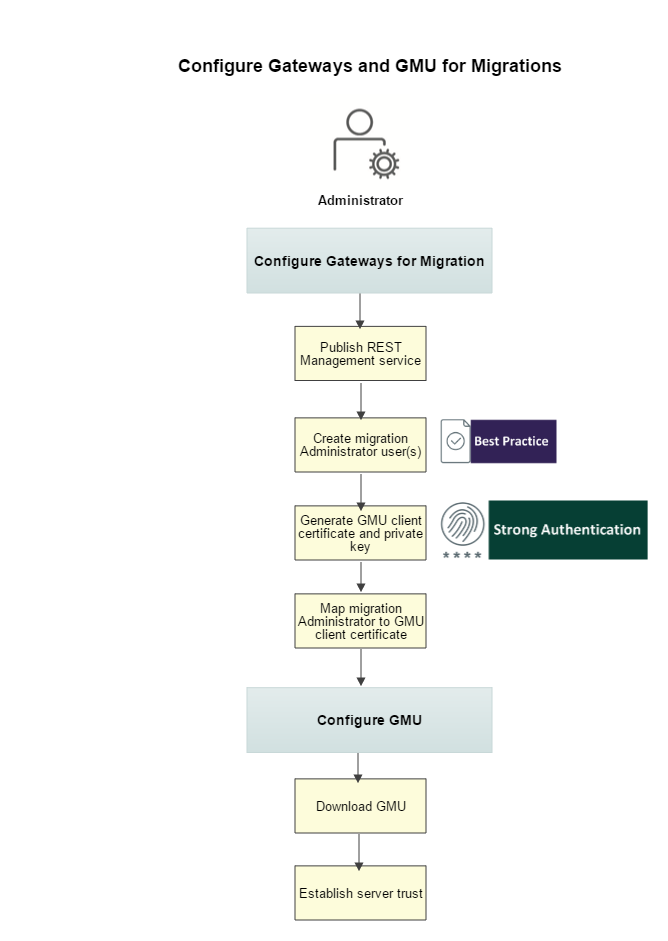
Step 1: Configure Gateways for Migration
Publish the REST Management Service
Publishing the REST Management service is required for new implementations.
Republishing the REST Management service is highly recommended for existing implementations to take advantage of these features:
- The newrestman.request.message.maxSizecluster property supports large migrations and controls the maximum request message size to the default REST Management Service. If you do not republish, migrations can fail using the existingio.xmlPartMaxBytesproperty, which is not adequate. (The cluster propertyio.xmlPartMaxBytesis a separate property and has no affect on the REST Management Service.)
- Support for mutual authentication
- On the sourceAPI Gateway, start Policy Manager.
- SelectTasks > Services and APIs > Publish Internal Service.
- SelectGateway REST Management Serviceand accept the default (or enter the appropriate Routing URI).A wildcard is required at the end of a URI for example:/restman/<optionalServiceName>/*
- ClickFinishand verify that the service is published.
- Repeat steps 1-4 on targetAPI Gateways.
- Access the REST Management API documentation:https://<GatewayHostName>:<port>/<GatewayRESTMANRoutingURI>/1.0/doc/home.htmlWildcards are not supported in the URI.
Create Migration Administrator Users
The best practice is to create separate migration Administrator users. Because migration Administrators are authenticated using certificates, they could be locked out of the Policy Manager if the certificates are lost. Separating regular Administrator from migration Administrators ensures that you always have a user who can log in to Policy Manager. Although losing a certificate is recoverable, it requires help from CA Support.
- On the source Gateway, log in to Policy Manager.
- SelectTasks > Users and Authentication >Create Internal Userand enter information for your migration Administrator user. Be sure to selectDefine Additional Properties.The migration Administrators that you create in this step are mapped to certificates in a later step.
- In the user Properties dialog, select theRolestab and then clickAdd.
- Select theAdministratorrole and then clickAdd.
- ClickOKto close the Properties dialog.
- Repeat steps 2-5 on any target Gateway that is involved in the migration.
Generate GMU Client Certificate and Private Key
The following instructions apply only to
CA API Gateway
s with a software keystore. For Gateways configured with a HSM (a hardware keystore), use OpenSSL.To ensure the strongest security (mutual authentication), GMU should use a client certificate to authenticate itself to every
API Gateway
that is involved in migrations. GMU also supports these less secure methods:- Basic SSL authentication with encoded passwords
- Basic SSL authentication with plaintext passwords (not recommended)
To generate a self-signed pkcs12 file using Policy Manager, follow these steps (or use openssl):
- On any Gateway with a default software keystore, log in to the Policy Manager.
- Go to:Tasks> Certificates, Keys, and Secrets >Manage Private Keys.
- ClickCreate.
- Enter an alias and clickCreate.The alias must match the migration Administrator that you created in the previous step, "Create Migration Administrator Users".
- Double-click the private key in the list.
- ClickExport Key, optionally specify a password, and save the certificate and private key in the pkcs12 file.
- Move the pkcs12 file into a folder for use with GMU commands (for example,--clientCert gmu.p12).
- ClickView Certificate, clickExport, and save the certificate file.
- Record the location of the certificate file (.pem format). (You need it in the next step to add the certificate to the Internal identity Providers.)
- (Optional). Delete the private key; it is not needed on theAPI Gateway.
Map Migration Administrators to GMU Client Certificate
- On the sourceAPI Gateway, log in to Policy Manager, click theIdentity Providerstab.
- UnderIdentity Providers, right-clickInternal Identity Providerand selectSearch Identity Provider.
- Double-click the migration Administrator.
- Select theCertificatetab, clickImport.
- In theAdd CertificateWizard, selectImport from a File, and import the certificate file (created in step 8 in the previous step).
- ClickBrowseto find your certificate and complete the wizard.
- Repeat steps 1-6 on targetAPI Gateways.
Step 2: Configure GMU
Download GMU
- Verify that the GMU computer meets requirements for operation.
- Log in to: CA Support.
- SelectDownload Managementand search for "ca api gateway".
- Select your Gateway product from the results that appear. A list of DVD images is displayed.
- Download theCA API Gateway Development Toolsimage and extract the image to a directory.
- Locate the fileGatewayMigrationUtility-x.x.xxand extract its contents.
- Configure Java environment variables.Windows: Java SDK/JRE bin directory must be set on the PATH or JAVA_HOME environment variable, or specified using the --jdk argument.Linux/Unix: Java SDK/JRE bin directory must be set on the PATH, JAVA_HOME, or SSG_JAVA_HOME environment variable, or specified using the --jdk argument.
Establish Server Trust
GMU must establish trust with migration Gateways using certificates. Follow these steps to add the source and target Gateway certificates to the GMU JDK trust store. You can skip this step if the JDK trust store already has the Certificate Authority (CA) that signs these server certificates.
Example: Linux
- On the source Gateway, log in to Policy Manager.
- Go to:Tasks > Certificates, Keys, and Secrets > Manage Private Keys.
- Double-click the defaultsslprivate key ("S" in the last column).
- ClickView Certificate.
- On theGeneraltab, clickExport,and save the file.
- On the computer running GMU, verify that JAVA_HOME is configured.
- Using the Java keytool, add the certificate to the JDK trust store.Example:JAVA_HOME is configured$JAVA_HOME/bin/keytool -importcert -alias <ssgcert_alias> -file <path to certificate file> -keystore $JAVA_HOME/jre/lib/security/cacerts -storepass <trust_store_password>Tip:If you see an error stating that a file or directory is not found, try removing "/jre" from the JAVA_HOME path shown above.The default password for <trust_store_password> is 'changeit'
- Repeat steps 1-7 on target Gateways.