Reimage a Physical Appliance
This topic describes how to reimage a gateway hardware appliance.
gateway90
This topic describes how to reimage a
CA API Gateway
hardware appliance. To reimage a Gateway Virtual Appliance, see Reimage a Virtual Appliance instead.
Refer to "When to Reimage" in Reimage Gateways for scenarios where reimaging may be required.
You have two options when reimaging an appliance:
- "Appliance" mode:Installs the Gateway image and "zeros out" the rest of the hard drive. This option removes all old data ensures a clean install, but it takes longer to complete.
- "Appliancenozero" mode:Installs the Gateway image and leaves the rest of the hard drive untouched. This option is quicker and is the default.
Prerequisites:
- You have downloaded the correct disk image.
- Knowledge of the Integrated Lights Out Manager (ILOM) for theAPI Gateway(if using the ILOM option).
To reimage a physical appliance
:- (Optional) Determine your appliance model number by running this command from a privileged shell:# dmidecode | grep -A3 '^System Information'
- If imaging anOracle Server X4-2appliance, do the following:
- Burn the .iso image onto a blank DVD disk.
- Insert this disk into the appliance and then reboot.
- Proceed to step 8.
If imaging any other model appliance, proceed to step 3. - Log in to the ILOM user interface of the Gateway appliance.
- Select the [Remote Control] tab and then click [Launch Remote Console]. If prompted by the browser, respond as follows:
- Select "Open" or "Run" if prompted by the browser.
- Select "Yes" if presented with a message stating that the web site’s certificate cannot be verified.
- Mount the appropriate disk image underDevices > CD ROM Image. (The screen sample above is for illustration only -- be sure you have downloaded the appropriate .ISO images.)
- Click [Open] to begin the reimage process.The reimage process may take 20-40 minutes to complete. During this time the system will appear to hang. Do not terminate the installation or power off the system.
- When reimaging is complete, log in to the Gateway as thessgconfiguser and then reboot the Gateway appliance using option "R" from the main menu.When the Gateway is rebooting, watch for text similar to the following:
 When this is displayed, press the <F8> key repeatedly until the following menu appears:
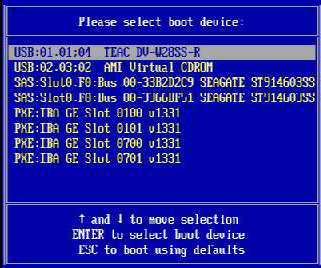 Use the down arrow key to select AMI Virtual CDROMand then press [Enter].
 - Select the appropriate behavior based on the type of hardware appliance in use. If you need assistance on selecting an option, contact your system administrator.If you see an error message "Cannot find kickstart file on CDROM", acknowledge the message. Press [Enter] when "Error downloading kickstart file" is displayed to continue the installation. Note that the process may appear to hang for several minutes before installation resumes. Do not interrupt the process or power off the system.
- When the installation is complete, press [Enter] to reboot the system. When the appliance is restarted, you see the normal login prompt:CA API Gateway vX.XKernel <version> on an x86_64Localhost login:
- Log in as userrootwith password7layerand then run this command:# exec ./sealsys allThis shuts your appliance down.
- Start the appliance and log in again asroot/7layer. Change your password when prompted.
Using the Thales nShield HSM
Complete these additional steps if you are intending to use the Thales nShield HSM with your Gateway:
- Check the run levels for thenc_hardserverandnc_driversdaemons with these commands:# chkconfig --list | grep nc_hardserver # chkconfig --list | grep nc_driversThe daemons must be "on" for levels 2, 3, 4, 5. If not, turn them on using these commands:# chkconfig --level 2345 nc_hardserver on # chkconfig --level 2345 nc_drivers on
- Check the module with this command:You should see a "Module 1" section listed.# /opt/nfast/bin/enquiry
- If the module is not running, execute following command:# /opt/nfast/sbin/install
You can now configure your Gateway.